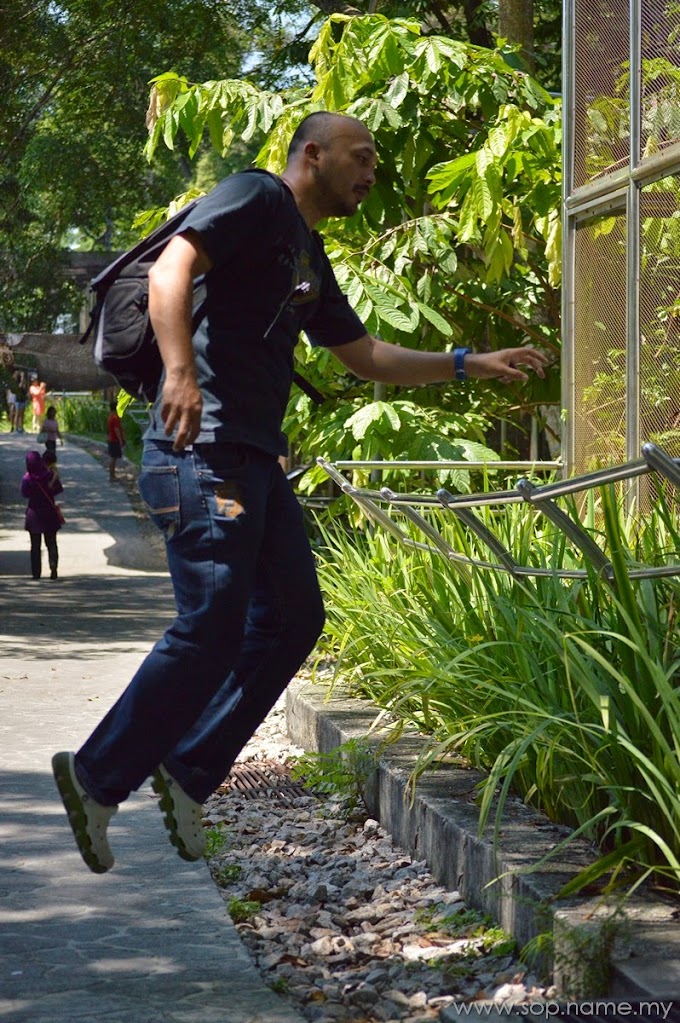
Method #1 Jumping as a levitation trick
The easiest way to give the look of levitation is by jumping. Choose a complementary background and then ask your model to jump. There’s not much magic to it. If you want your props to float, whether it’s a book or a candle, the same principle applies. Make sure there’s no one around when you’re throwing the objects and that they aren’t fragile enough to break when they hit the ground. The benefits of this levitation trick are that it’s quick and easy and you don’t have to do much during editing. But sadly, you can’t plan the precise outcome. Moreover, your models may not be too happy about jumping all the time, especially because it could lead to injuries.
Method #2 Levitating with furniture
If you’re not too fond of jumping, there’s a way to accomplish levitating photography with the appropriate furniture and some photography techniques. You’ll need a stool, ladder, little table, or anything that you can balance your model on. Set your camera on a tripod. Take a photo of the model balancing on that piece of furniture. Ask them to stand, lie, or sit. Without changing the position and settings of the camera, take a second photo of only the background, without the model and the piece of furniture. Then you’ll need to know how to remove something from a picture. After you do this in Photoshop or Luminar, there will come the tricky part of combining the two images and making sure that the space previously occupied by the furniture looks natural. This way, you’re “borrowing” parts from your background photo and applying them to the space where the furniture was. The result is an effortlessly levitating model!
Method #3 Levitating with props
This way suits professionals and those who can spend a little extra money on the setup. You can always arrange your levitation photo with cords, strings, or other props to make objects float in the air. This is a great idea if you want to balance multiple objects in midair around the model and you can attach them all with strings or cords to the ceiling or a tree. Make sure that your model feels comfortable suspended and don’t let them stay like this for too long. This option allows you to only edit out the strings. The clothes and hair of your models will fall down naturally, creating a great levitation trick.
Levitation photography explained
Now that we’ve revealed the magic, let’s take a closer look at some of the photography techniques used in levitating photos.
Photography gear and model
The most important thing you need is a camera, a tripod, a willing model, and some suitable furniture. Other than that, you can also grab a fan (to create a floating effect for long-haired models), some light reflectors, and other props. Make sure that the model knows what they’re getting themselves into: floating poses are not a walk in the park. They’ll often have to balance in uncomfortable ways to create the illusion of levitation.
Other props
Don’t overlook seemingly tiny details, like the model’s outfit or the setting for the levitating scene. If you want to create a floating effect, don’t choose extra tight clothes for your model. Choose something light that can float around or otherwise give the illusion of movement. Levitation photography works wonderfully with dresses and long scarves and with skirts and unbuttoned shirts. If you want to create a beautiful thematic scene, think about the space beforehand. What kinds of objects would best suit this scene? If the levitation occurs because of strong wind, how does it affect the other objects in the room? Maybe you need to open a door or a window, bend some small trees and bushes, or make sure that the room is in disarray. Even magic needs logic to look believable!
Weather
Try to schedule your shoot for a cloudy day. This is important because overly dark shadows from your objects will be hard to edit out in post-production. Always make sure that the shadows are realistic and don’t give away your levitation magic. Sometimes photographers invite assistants to keep the model upright or hold some objects. In this case, also make sure to remove the shadows from beneath them when you’re editing your photos.
Shooting angle
An important part of your photography technique is the shooting angle. The shooting angle can make a difference. Shooting from a low angle will create an illusion that the model is higher in the air. However, this also means that your prop may cover parts of the model’s body. That’s a very hard misstep to fix in post-production. Make sure that the prop remains in the background in relation to the model. Shooting from a higher angle will not create a levitation photograph, but rather a falling one. However, you can experiment with different shooting angles until you’re satisfied with the result.
Levitation photography ideas
Now that you’re ready, here are some great ideas for how to levitate your models and objects and boost your creativity in levitation photography.
Consider the pose
The model’s pose is really important. Your levitation shots should be believable. The pose might change depending on the narrative. Someone using magic and defying gravity and someone being blown away by a gust of wind entail different photographic details. Sure, you can ask your model to sit in the lotus position, pretending that hard meditation did the trick. But make sure that the model looks like they’re floating: someone standing casually or leaning against a wall might not be a good idea.
Levitation with objects
If you don’t want to levitate people, objects will do just fine. You can suspend a bottle over a book, eggs over a pan, or a tea set in midair. But we advise you to choose small objects that can’t break easily. For example, you can make paper cranes float and they’ll create a stunning and surreal effect. Another photography technique is to suspend multiple objects using one string, creating a motion effect.
Balance two people
How can you levitate two people? The same principle applies, but when levitating two or more people, the stakes are higher. Think of beautiful floating poses beforehand. Balance everyone correctly and make sure that the shadows are on point. You can always make only one of the models float while the other is holding their hand and keeping them from flying away. The composition is your way to express your creativity, but your models should feel comfortable, know exactly what they’re doing, and feel safe balancing on furniture or props. Moreover, floating poses should look believable in post-production, including the hair, outfits, shadows, and even facial expressions.
Create a story
Levitating photography is one of the most creative and artistic photography techniques. You can tell a whole story with one photograph and winning floating poses. By making your model levitate above a bed, you can convey the surrealness of dreams. By making a young man with a flower float above the ground, you can convey the feeling of love when you rush on a first date. Think of your personal levitation definition: something romantic and beautiful, or a scary and surreal experience. Then tell your story through photographs. There are endless possibilities for you to discover with this wonderful technique.
Use colors
You can enhance any photograph by using the right colors. Red for passion, blue for melancholy, black for gloom. Create a feeling that your model is lighter than a feather by dressing her in a white dress. Use a gloomy background and dark tones to create the illusion of sadness around your floating model. When you create a story through subtle details, you’ll be able to add depth to your photographs.


0 Comments